![Older woman stepping out bathtub safely[1]](https://www.grayingwithgrace.com/wp-content/uploads/2026/02/older_woman_stepping_out_bathtub_safely1-e1770045404408.jpg)
Every year, thousands of older adults end up in the emergency room because of bathroom falls. The most commonly recommended solution? Install grab bars. But there's a problem many of us don't talk about: grab bars change how your home looks and feels, making you confront aging in a way that's uncomfortable.
I get it. You've spent decades making your home reflect your style and personality. The last thing you want is for it to look like a hospital.
Here's the good news: there's an affordable, nearly invisible solution that addresses the actual cause of most bathroom falls—and it costs about $23. No major installation required. No institutional look. Just smart prevention that works.
nn


nn
Before I reveal what it is, you need to understand where bathroom falls actually happen. Because once you see that, the solution becomes obvious.
<<VIDEO_PLACEHOLDER>>
<<<LEAD_MAGNET_HERE>>>
The Real Culprit Behind Bathroom Falls (And Why Grab Bars Miss the Mark)
Most people assume bathroom falls happen while standing in the shower or getting up from the toilet. That's why grab bars get pushed so hard.
But here's what actually happens: the majority of bathroom falls occur during transitions between wet and dry surfaces. Stepping into the tub. Stepping out onto a wet floor. Moving from the bath mat to the tile.
These are traction problems, not stability problems.
Grab bars help you steady yourself while standing in one place. They don't do anything about your feet slipping during movement. And as our vision changes with age, it becomes harder to judge where wet surfaces end and dry ones begin—especially when there's no visual contrast.
Think about it: have you ever caught yourself mid-slip stepping out of the shower? That split second where your foot slides just an inch before you catch yourself?
That's not a balance issue. That's a friction issue.
The solution isn't about admitting you need help standing. It's about addressing the physics of wet surfaces.
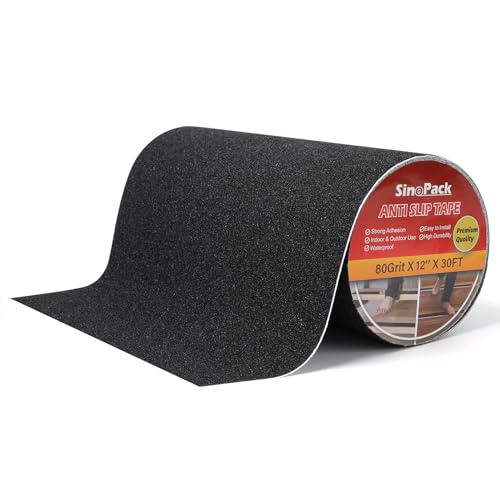
The Nearly Invisible Fix
High-contrast adhesive traction strips are thin, textured strips you apply directly to slippery surfaces. They come in clear or subtle colors that blend with your tub or shower floor.
They do two things simultaneously:
- Provide grip exactly where your foot lands
- Create visual contrast so you can clearly see the edge of surfaces
A pack costs around $23 and takes about 15 minutes to install. No drilling. No permanent changes. Just peel, stick, and press firmly.
Place them where you step in and out of the tub, on the shower floor, and along the edge where water tends to pool. The textured surface gives your feet something to grip, even when wet.
This addresses the actual cause of most bathroom falls: slipping during transitions.

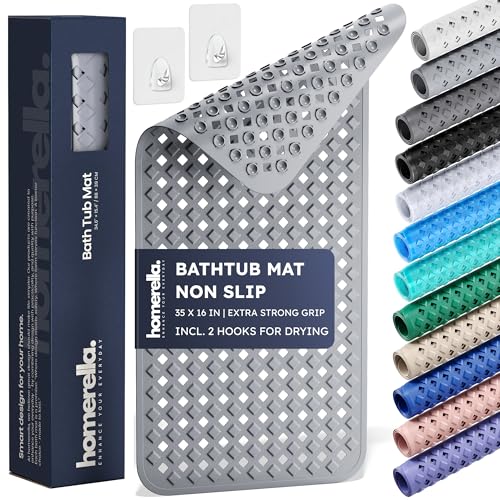
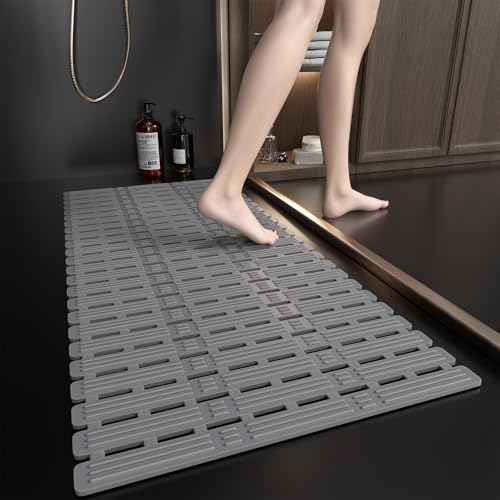
The Bath Mat Mistake That Actually Increases Your Fall Risk
Let me guess: you have a bath mat outside your shower or tub. Most people do.
But here's what I see all the time—bath mats that bunch up, slide around, or create their own tripping hazard.
A bath mat that moves under your feet is worse than no bath mat at all. It gives you a false sense of security right before it betrays you.
The problem happens at the edges. You step out with wet feet, land partially on the mat and partially on tile, and your weight shifts. The mat slides. You slip.
How to Use Bath Mats Correctly
First, check if your current mat actually stays put. Step on it with wet feet and try to slide it. If it moves even slightly, it's a hazard.
Get a mat with proper rubber backing—not the cheap kind that stops working after a few washes. The backing should feel tacky to the touch, not smooth.
nn


nn
Second, position it strategically. The mat should start right at the tub edge, not six inches away. Your first step should land completely on the mat, not half-on, half-off.
Many people find that two smaller mats work better than one large one: one immediately outside the tub, and one near the sink if that area gets wet too.
Test your setup: Step out of the shower the way you normally would. Does your foot land entirely on the mat? Does the mat stay firmly in place?
If not, adjust until it does. This isn't about whether you use a bath mat—it's about using it correctly.

The Midnight Bathroom Trip Problem (And Its Simple Solution)
Bathroom falls don't just happen during showers. Many occur during nighttime bathroom trips when you're half-asleep and the lighting is poor.
You wake up needing the bathroom. You navigate in the dark because you don't want to turn on harsh overhead lights. You misjudge the doorway, or slip on the tile, or trip over something you can't quite see.
Understanding your personal energy patterns can help you recognize when you're most vulnerable to accidents, including at night when alertness is naturally lower.
Your night vision isn't what it used to be. Depth perception diminishes in low light. You can't accurately judge where surfaces meet or how far away objects are.
Reaching for light switches in the dark creates its own risks—you're off-balance, reaching, moving before you can fully see.
The Automatic Lighting Solution
Motion-activated nightlights solve this problem completely. They turn on automatically when you move, providing gentle illumination without the harsh awakening of overhead lights.
Place them along the path from your bed to the bathroom: one in the bedroom, one in the hallway, one in the bathroom. They should create a continuous line of soft light.
LED strip lighting is another option—you can install it along baseboards or under cabinet edges. It provides enough light to see clearly without being jarring.
These solutions cost between $10-30 depending on how many you need. Most are battery-powered or plug directly into outlets, so no electrical work required.
nn


![L LOHAS LED Motion Sensor Night Light, [2 Pack] Motion](https://m.media-amazon.com/images/I/31hC9BDG-PL._SL500_.jpg)


nn
Making your home safer for nighttime navigation extends beyond just the bathroom—your entire path from bed should be illuminated.
Map out your route tonight. Where are the dark spots? Those are the places that need lighting.
This isn't about admitting poor eyesight. It's about removing unnecessary obstacles when you're half-asleep.
Ready to discover more ways to age safely at home without institutional modifications? Subscribe to our newsletter for expert-tested tips and dignity-preserving solutions delivered weekly.

The Towel Bar Trap (Why What You're Grabbing Could Hurt You)
Be honest: do you ever grab the towel bar for balance when getting in or out of the tub?
I see this constantly. The towel bar is right there, at the perfect height, and it feels solid. So you use it for support.
Here's the problem: towel bars aren't designed to hold body weight. They're mounted with lightweight hardware meant for hanging towels, not supporting 100+ pounds of shifting weight.
When you pull on a towel bar for balance, you're trusting something that could give way at the worst possible moment. And when something you're grabbing suddenly pulls away from the wall, you don't just fall—you fall with momentum in an unexpected direction.
That's how people end up with serious injuries.
What to Do Instead
First, identify if you're currently using towel bars, shower caddies, or soap dishes for balance. These are all designed for light-duty use only.
If you find yourself reaching for support in certain spots, those are the locations that actually need grab bars—properly installed ones, mounted into wall studs with heavy-duty hardware.
I know this article is about alternatives to grab bars, but I have to be straight with you: if you need something to grab for support while standing or moving, a grab bar is the right tool. Understanding when to make necessary modifications is part of smart aging.
The good news? Grab bars now come in styles that don't look institutional. You can find ones that match your bathroom fixtures, in brushed nickel, oil-rubbed bronze, or polished chrome.
If permanent installation isn't an option, suction-cup grab bars exist for temporary or rental situations. They're not rated for full body weight during a fall, but they provide steadying support for transitions.
The key distinction: traction strips prevent slips during movement. Grab bars provide support while standing. They solve different problems and aren't mutually exclusive.

The Shower Chair Position That Makes All the Difference
If you use a shower chair, its placement matters more than you might think.
Many people position the chair wherever it fits, then stretch and reach for controls, shampoo, or the shower head. That stretching while seated creates instability—you're off-center, arms extended, weight shifted.
A shower chair should be positioned so everything you need is within comfortable reach. The controls, the shower head holder, your soap and shampoo.
If you have to lean or stretch, the chair is in the wrong spot.
Optimizing Your Setup
Sit in your shower chair and reach for the things you use. Can you access them without leaning or extending your arms fully?
If not, can you move the chair? If space is tight, can you relocate the items instead—use a shower caddy to bring products closer, or adjust the shower head holder?
Also check the chair legs. They should have rubber tips that grip the tub or shower floor. If the tips are worn smooth, replace them—they're inexpensive and universally available.
Here's something many people miss: even with a shower chair, you still need traction strips. The chair prevents standing-related falls, but you still have to get in and out of the tub. You still transition from wet to dry surfaces.
Making strategic modifications that work with your current mobility level is about right-sizing solutions to actual needs, not doing the maximum 'just in case.'
Layer your safety measures: traction strips where you step, proper mat placement outside the tub, chair positioned for easy reach, rubber-tipped legs that grip.
Each element addresses a different risk. Together, they create comprehensive safety without the institutional look.
<<<LEAD_MAGNET_HERE>>>

Your Action Plan: What to Do This Week
You now know that preventing bathroom falls isn't about accepting institutional-looking grab bars or spending hundreds on renovation. It's about addressing actual causes: traction, visibility, lighting, and smart positioning.
Start with your highest-risk areas:
Immediate (this week):
- Order high-contrast traction strips ($23) and apply them to tub/shower surfaces
- Test your bath mat—if it slides, replace it with one that has proper rubber backing
- Install motion-activated nightlights ($10-30) along your bedroom-to-bathroom path
- Check if you're using towel bars for balance (stop immediately if you are)
This month:
- Evaluate shower chair positioning if you use one
- Replace worn rubber tips on chair legs
- Consider whether specific spots need actual grab bars installed
- Schedule a free home safety assessment with an occupational therapist (most insurance covers this)
That last point is important: professional occupational therapists can identify risks you might not notice and suggest personalized solutions based on your specific bathroom layout and mobility.
Medicare and most insurance plans cover these assessments when ordered by your doctor. It's worth asking about.
The Bottom Line
The $23 investment in traction strips, combined with strategic thinking about mat placement and lighting, addresses where bathroom falls actually happen—during transitions between surfaces when lighting is poor.
This isn't about avoiding safety modifications out of vanity. It's about implementing effective solutions that respect both your safety and your home's aesthetics.
Maintaining independence at home means making smart adaptations before problems occur, not waiting until after an injury to take action.
Your bathroom doesn't need to look institutional to be safe. Start with the $23 solution this week, and build from there based on your specific needs.
The goal isn't perfection. It's prevention through practical changes you can implement today.
![Older man forward reaching toilet paper holder[1]](https://www.grayingwithgrace.com/wp-content/uploads/2026/01/older_man_forward_reaching_toilet_paper_holder1-e1770044956752-450x300.jpg)
![Senior hand grabs modern safety bar[1]](https://www.grayingwithgrace.com/wp-content/uploads/2025/07/senior_hand_grabs_modern_safety_bar1-e1751920037380-450x300.jpg)


